

Which kind of shutter are we discussing?
These are external aluminium roller shutters: a curtain of slats travels in side guides and winds onto a shaft inside a box. They are not indoor fabric roller blinds. The supplied catalogue also covers textile screens, external Venetian blinds and insect screens, but their details should not be confused with shutter details.
A closed shutter helps control light and privacy. Thermal performance, wind resistance and security, however, need to be assessed for the actual assembly. An aluminium curtain alone is not evidence of burglary resistance or protection against a blast wave.
The catalogue shows three distinct ways of positioning the box:
| Arrangement | Box position | First point to check |
|---|---|---|
| Front-mounted SK, SKO, SKE, SKP, SKO-P | Outside the window or in front of the lintel area | Loss of visible glass and a suitable fixing substrate |
| Concealed SP, SP-E | Within the facade finish zone, in front of the window | Space for the box, insulation behind it and inspection access |
| Top-mounted SKT, SKB | Above the frame, within the opening's head detail | Overall assembly height, connection to the frame and insulation |
This is a decision guide, not a compatibility table. Similar-looking boxes can use different adapters, guides and maintenance arrangements.
Detail 1. A front-mounted box for an existing window
A front-mounted arrangement is worth considering for an existing building or a shading upgrade without rebuilding the whole opening. The first drawing shows the difference between a box beside the lintel and one positioned lower, in front of the upper frame.
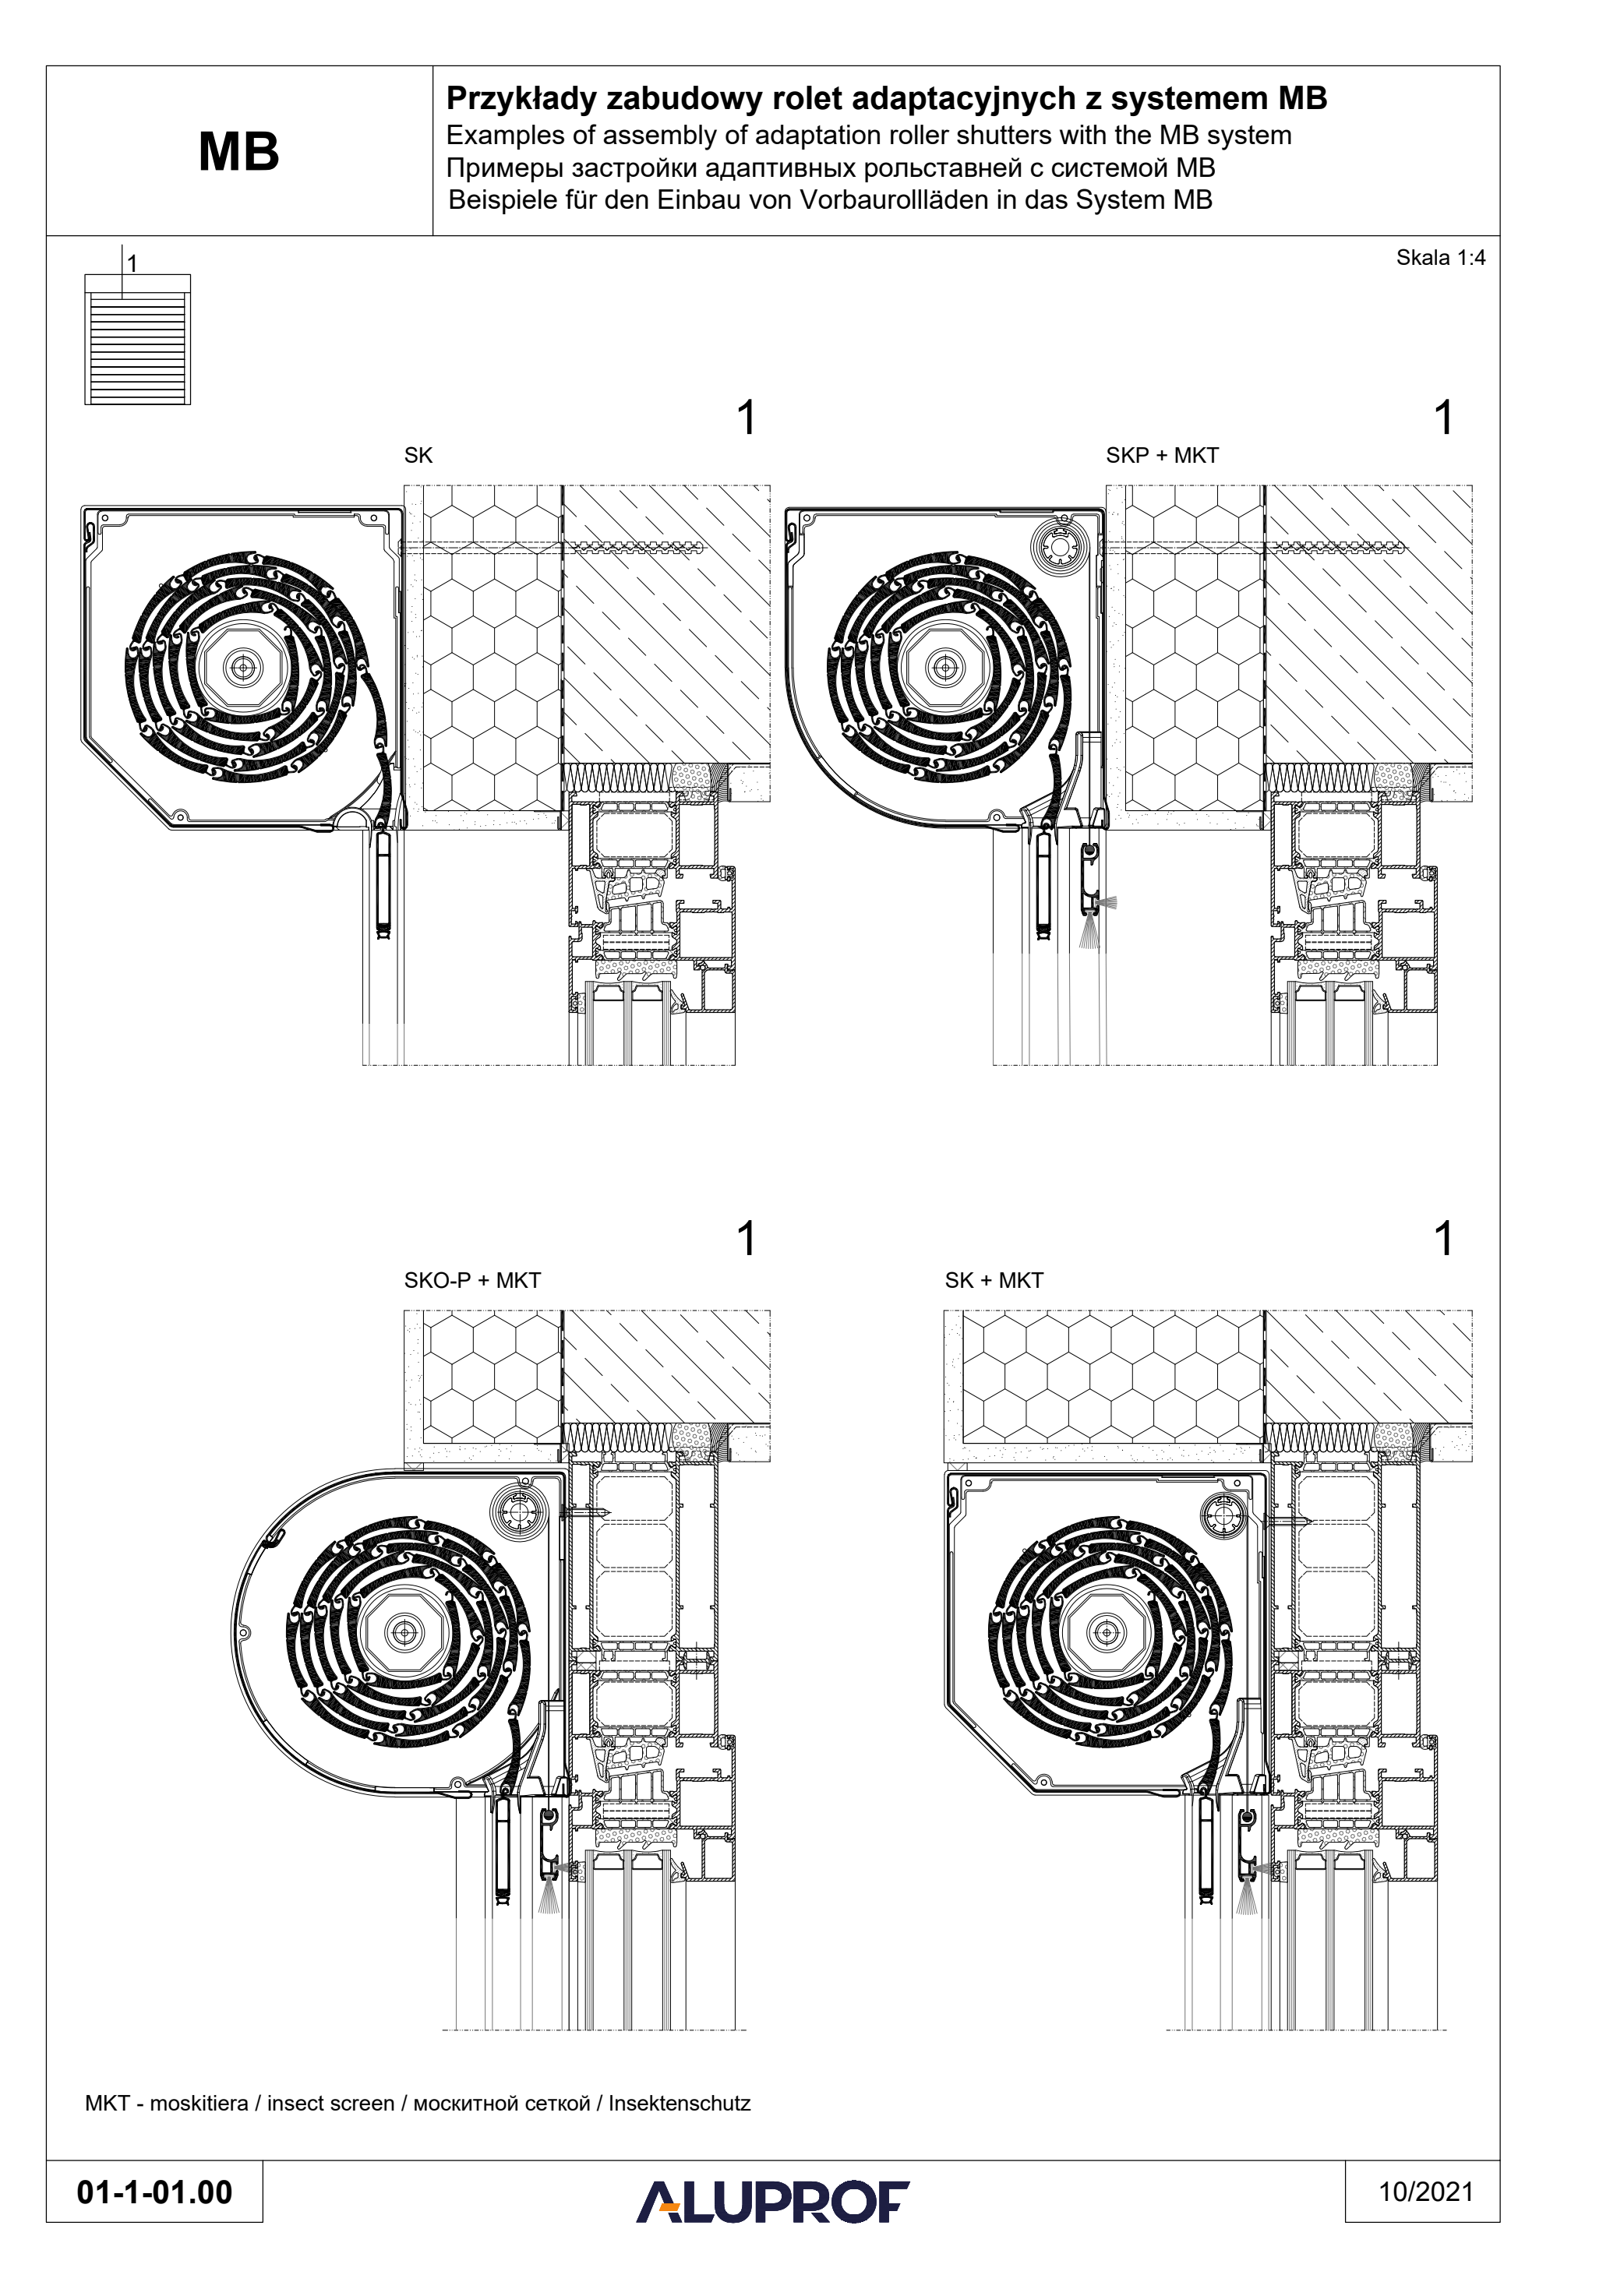
© ALUPROF · 01-1-01.00 · 10/2021 · PDF p. 12
Original sheet, with labels preserved. Catalogue example for Aluprof MB, not a working drawing for your property. Screen scale is not 1:4.
Open full-size drawing ↗In the upper-left SK example, the box sits outside the insulated area beside the lintel. In the lower examples it drops in front of the window assembly. That decision affects both the facade appearance and how much of the upper window remains exposed.
MKT denotes an integrated insect screen. It has its own roll and needs space within the system. Do not assume it can be added to any previously selected box without checking the configuration.
Before ordering, check the substrate and fixing arrangement, reveal depth, guide position and the opening sash's movement. On a completed facade, also agree how fixing and cable penetrations will be sealed.
Detail 2. Concealed SP-E: hide the box, keep the access
Concealed shutters give a quieter facade, without a projecting box. But concealment means reserving space in the design. It does not simply mean adding a thicker layer of render afterwards.
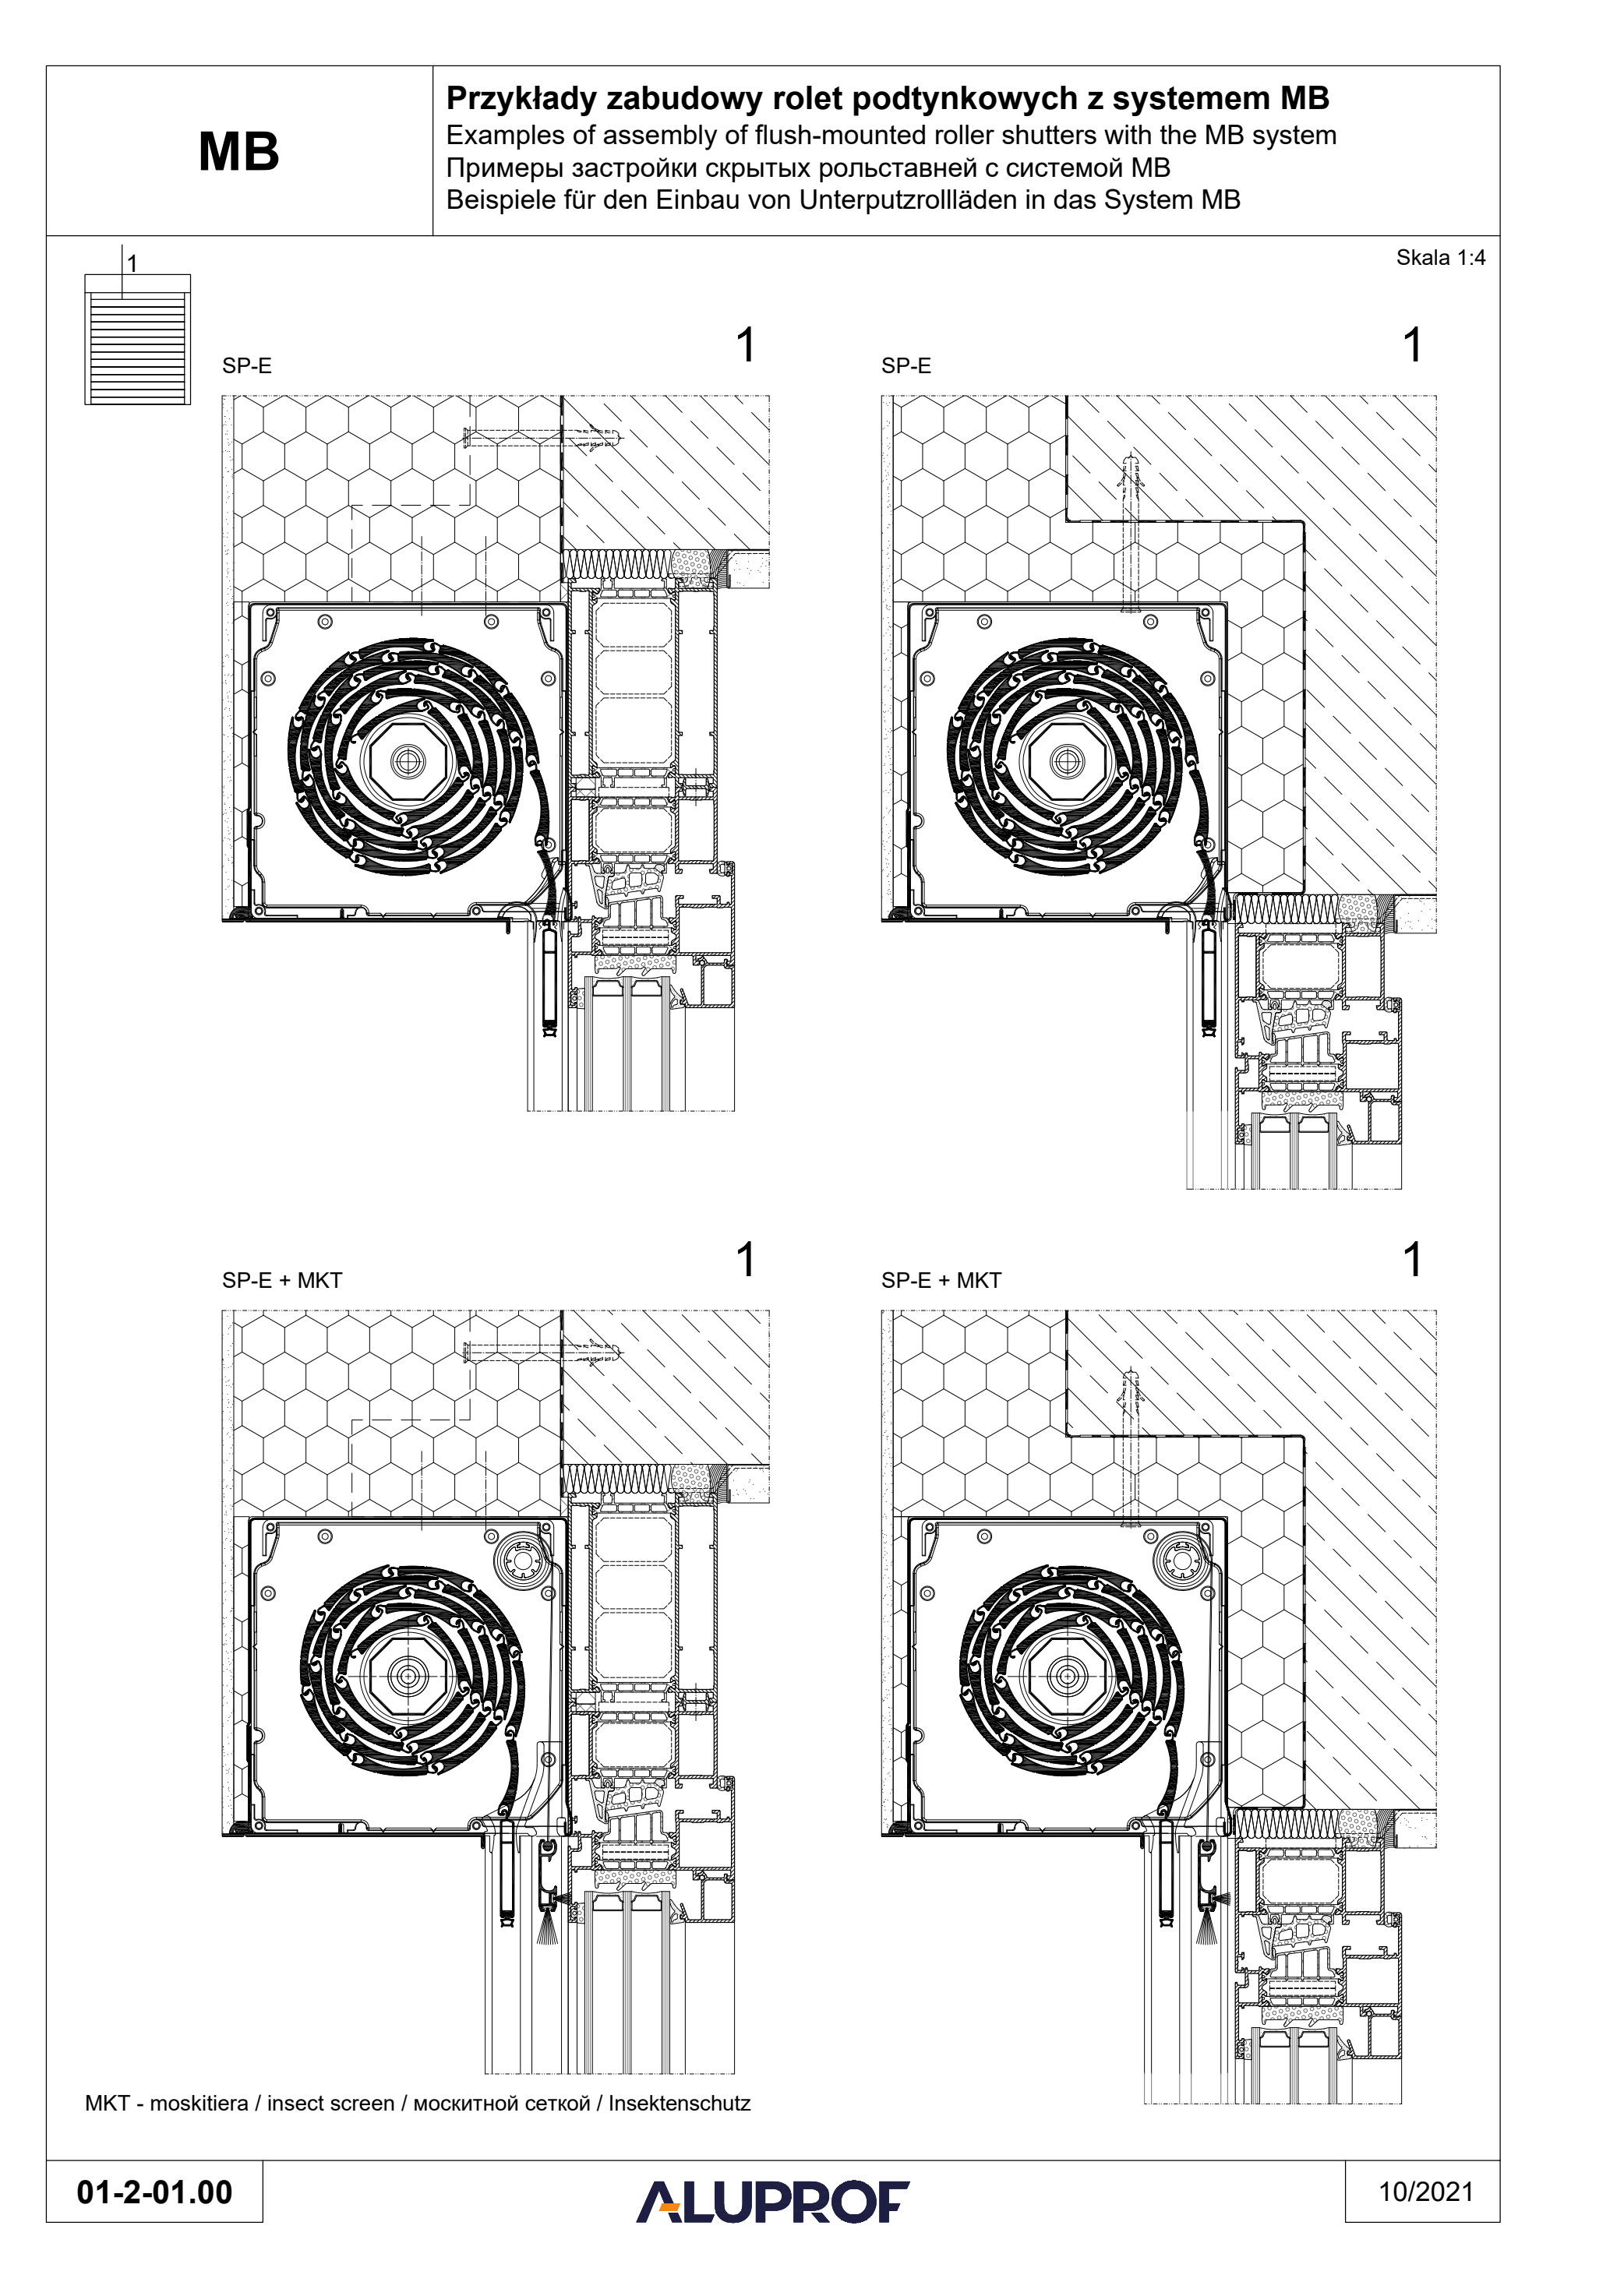
© ALUPROF · 01-2-01.00 · 10/2021 · PDF p. 16
Original sheet, with labels preserved. Catalogue example for Aluprof MB, not a working drawing for your property. Screen scale is not 1:4.
Open full-size drawing ↗The SP-E drawing shows different frame and lintel positions. In some examples the upper frame is behind the box; in others an insulation zone separates it from the structural construction. The lower row shows versions with insect screens.
The useful question is: what will actually be behind your box? If the detail creates a continuous cold zone or leaves too little space for insulation, a neat facade will not solve its thermal performance. The layer build-up must be assessed for the real wall and window system, not copied because a picture looks similar.
The service cover and its fixings need to remain accessible. Replacing a drive should not require demolition of a finished reveal. The working drawing should identify the render boundary, insulation junction and the route for removing the cover.
Detail 3. Top-mounted SKB: size the window and box together
In a top-mounted system, the box sits above the frame. It affects the whole head detail: window dimensions, connection to the lintel, insulation and maintenance access. Selecting it separately from the window can create a height conflict that changes the proportions of the opening.
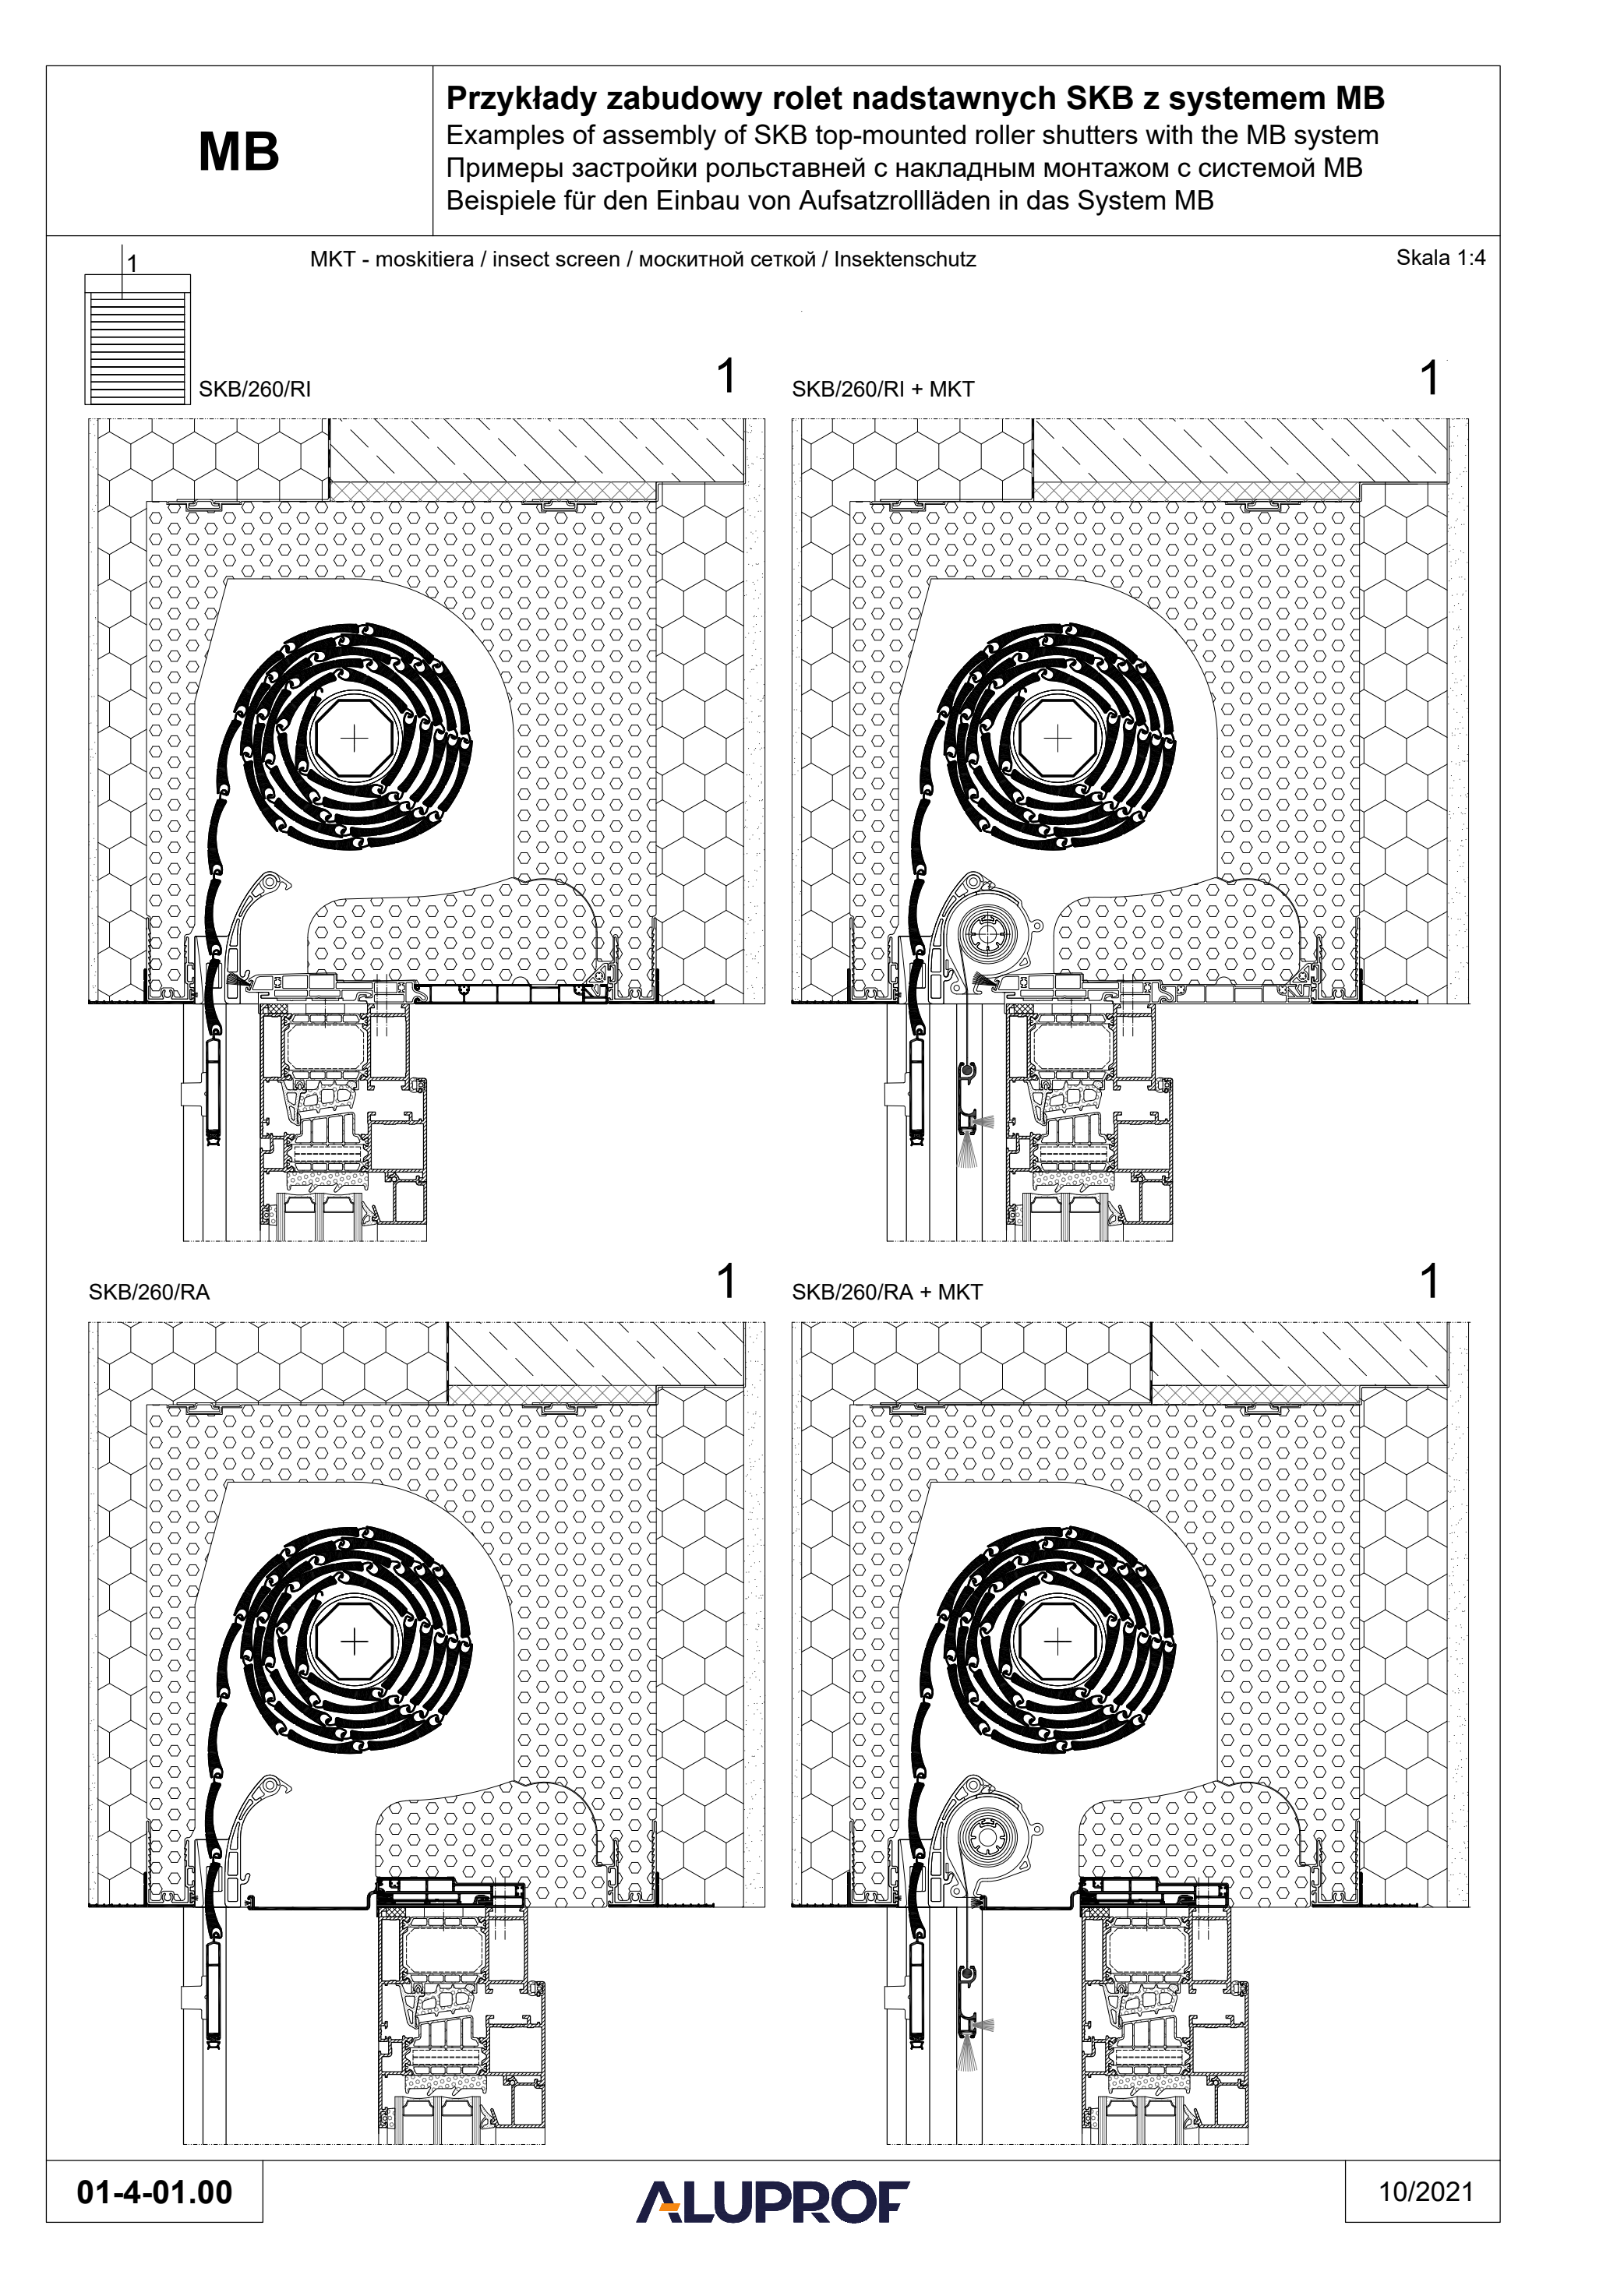
© ALUPROF · 01-4-01.00 · 10/2021 · PDF p. 24
Original sheet, with labels preserved. Catalogue example for Aluprof MB, not a working drawing for your property. Screen scale is not 1:4.
Open full-size drawing ↗The sheet shows SKB/260/RI and SKB/260/RA, including MKT versions. The insulation body around the roll is clearly visible, as are different arrangements at the bottom of the box. Confirm the inspection side for the actual variant and preserve access after finishing.
Do not treat a shutter box as a substitute for a structural lintel. Load transfer, fixings and connection to the frame follow the manufacturer's documentation and the project design. Nor does the model designation on this sheet mean its dimensions suit every curtain height.
Detail 4. Side guides: a small profile with many dependencies
The head section shows the box, but it cannot answer every question. A horizontal section is also needed to coordinate the guide with the frame, reveal and adjacent shutter.
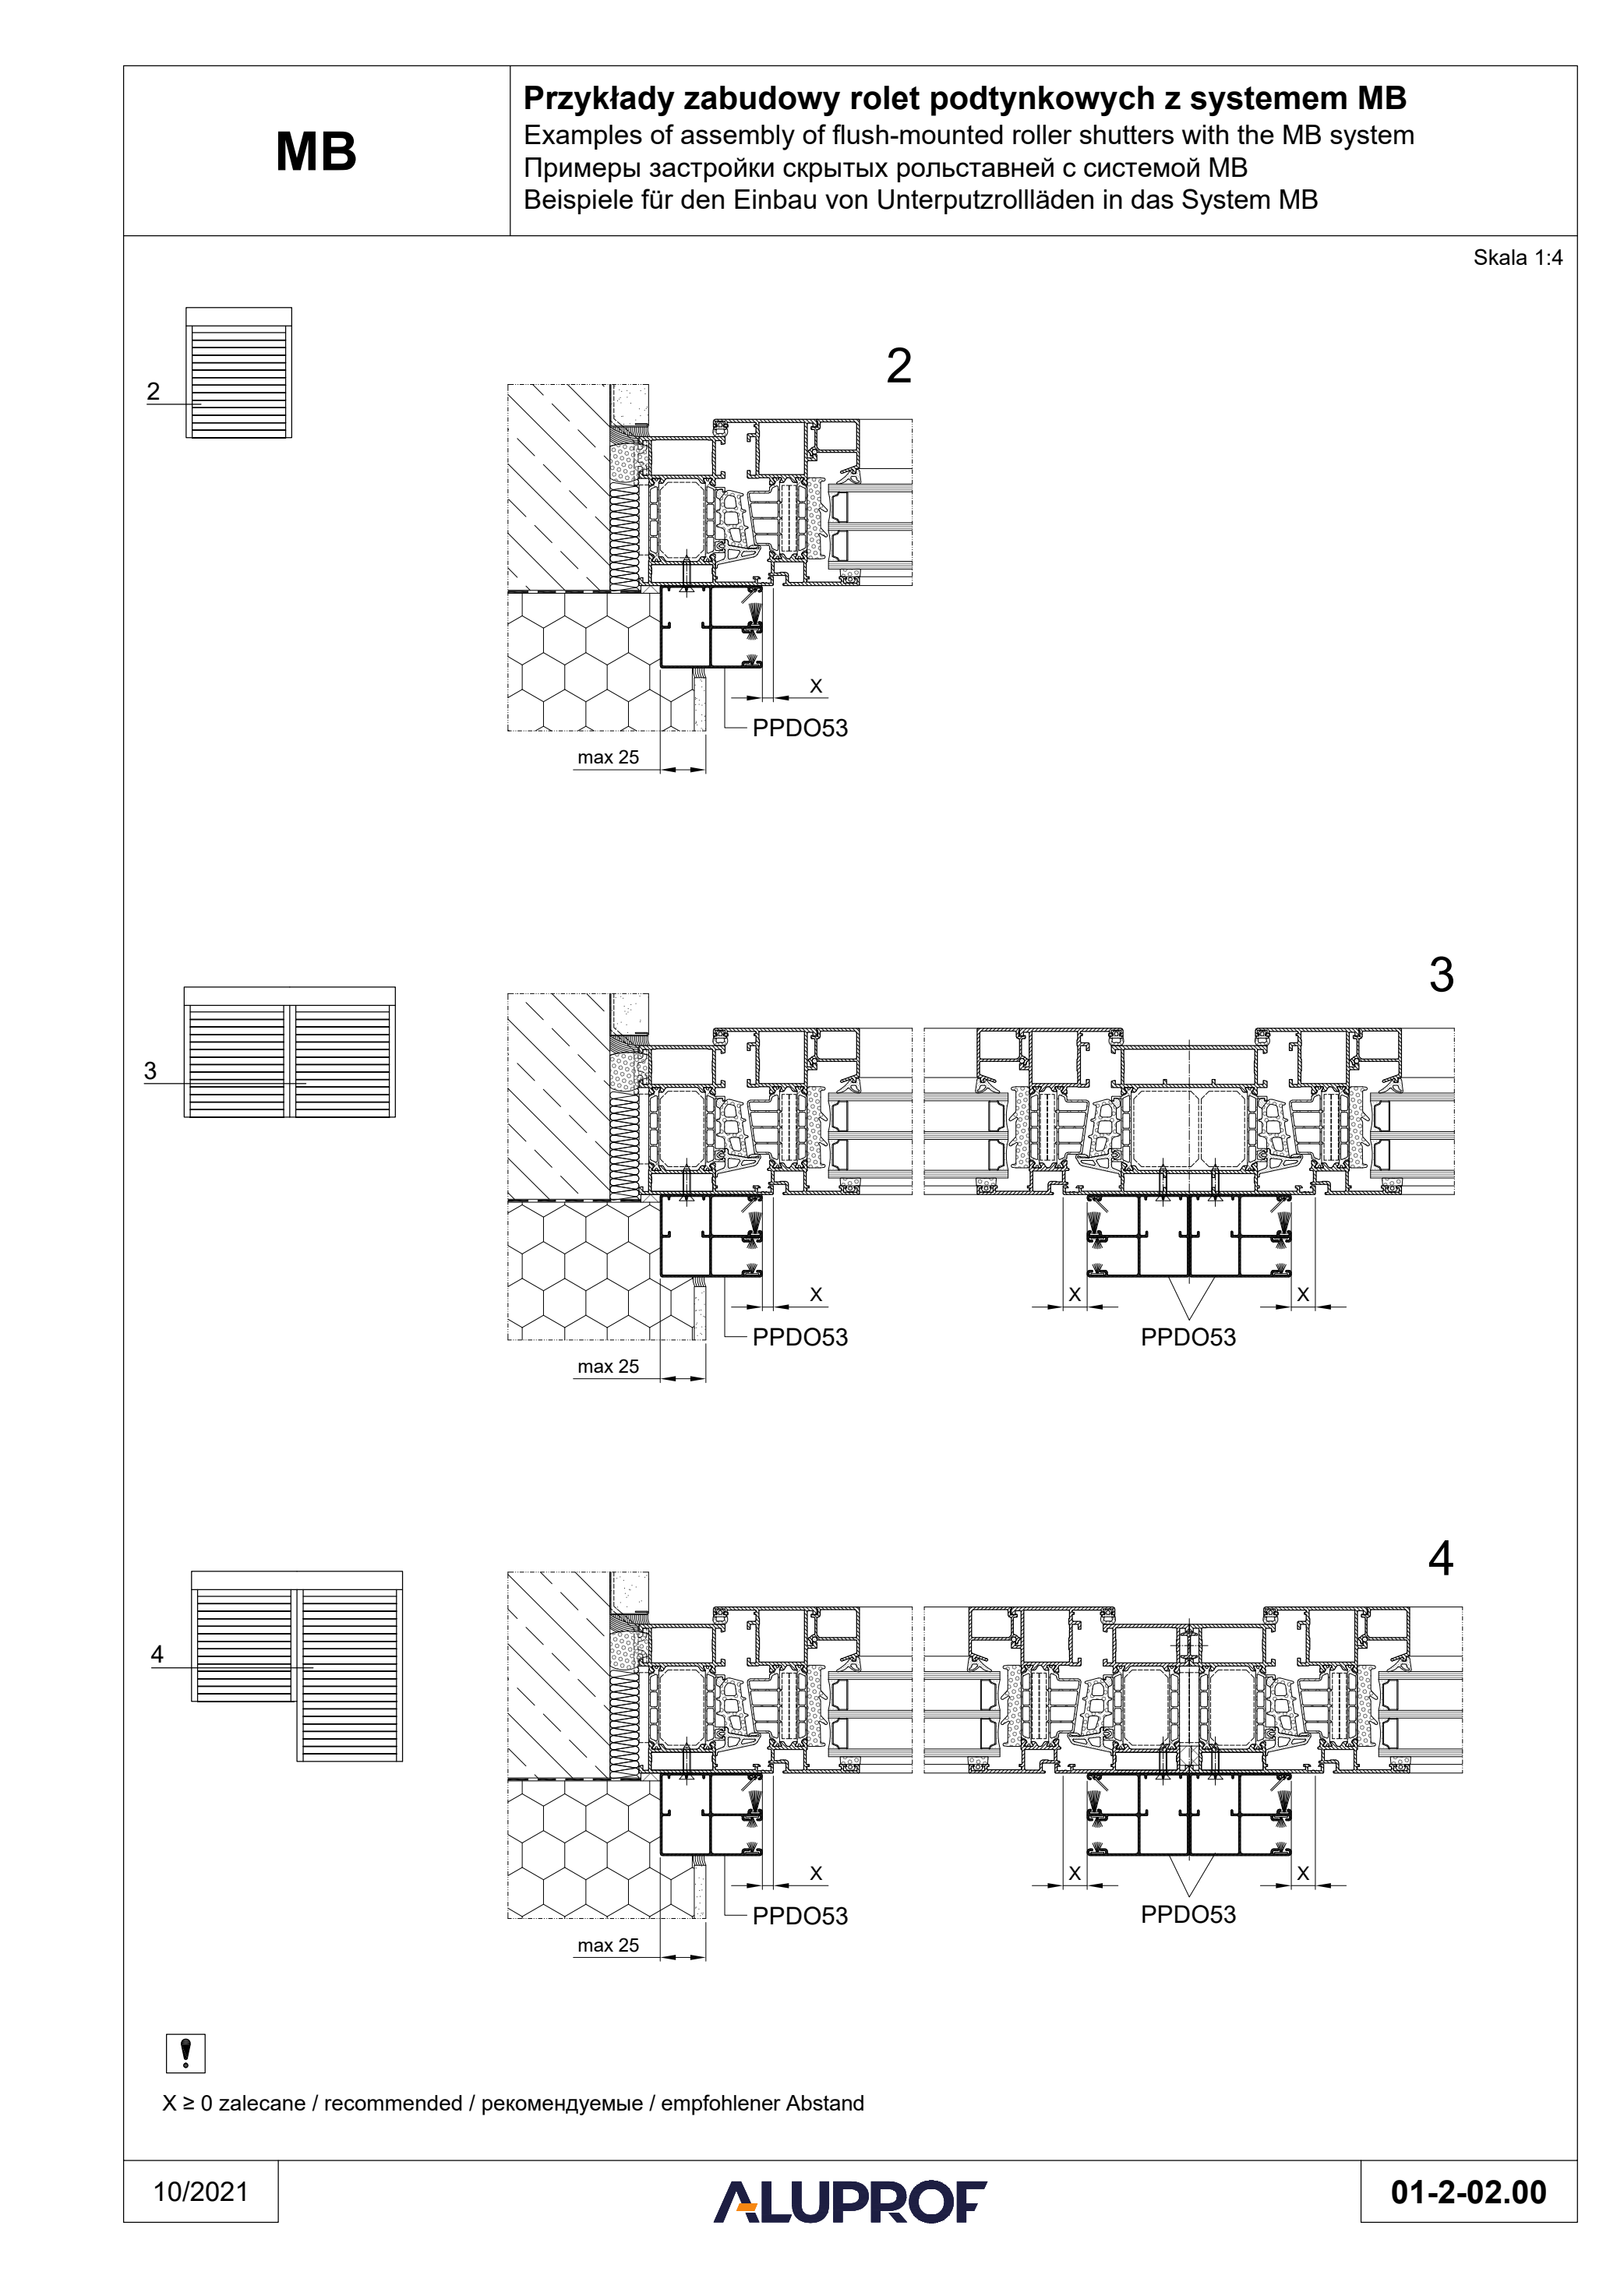
© ALUPROF · 01-2-02.00 · 10/2021 · PDF p. 17
Original sheet, with labels preserved. Catalogue example for Aluprof MB, not a working drawing for your property. Screen scale is not 1:4.
Open full-size drawing ↗The PPDO53 sheet shows side junctions and arrangements beside the intermediate elements of a window assembly. It explains why the division of the windows and shutters should be coordinated: their vertical lines may otherwise differ from the intended elevation.
The drawing includes X ≥ 0 and max 25. These belong to the illustrated catalogue details, not to a universal installation gap. They should not be transferred to another frame or guide without checking. The original 1:4 scale also does not apply to the screen image; do not measure components from the displayed drawing.
Check that the guides do not obstruct opening or the drainage openings required by the window manufacturer. Fixings must suit the substrate and loads. Render or insulation alone should not be assumed to provide an adequate load-bearing fixing base.
What to agree before ordering
The most useful outcome is a coordinated detail, not just a model name on a quotation. It needs:
- Opening, frame and curtain dimensions, including space for the rolled curtain.
- Head and side sections showing the actual wall and facade layers.
- Permitted dimensions and wind resistance checked for the selected curtain and guides.
- Fixing and sealing details with the required drainage routes kept clear.
- Controls, power supply and drive access. For powered shutters, discuss what happens during a power cut; not every motor provides manual emergency opening.
- A check that a lowered shutter will not obstruct a required escape route.
Where burglary resistance is required, obtain documentation for the relevant assembly and configuration. The catalogue identifies SAR separately for this purpose; ordinary SK or SP-E assemblies should not automatically be assigned the same properties.
Roller shutters in Kyiv and Kharkiv: what to send for a quotation
To discuss roller shutters with BIFORIUM in Kyiv or Kharkiv, prepare facade photographs, opening dimensions and the window system name, if known. For a new home, add a wall section, insulation thickness and the intended finished facade plane. For an existing apartment, include head and side reveal photographs and information about access to the outside of the window.
The city name alone does not determine the installation detail. Floor level, exposure, fixing substrate and the building's stage of completion matter more. Establish any necessary approvals for facade appearance or work before placing the order.
The installed price of roller shutters depends on more than area: curtain, box, guides, drive, insect screen, electrical preparation and installation access all affect the scope. Compare quotations for an equivalent configuration and a clear list of work, rather than a square-metre figure alone.
Send drawings or photographs to discuss your shutters. The contact page lists the Kyiv and Kharkiv offices. If the window is also being replaced, review its waterproofing junctions at the same time.
Drawing source and scope
The illustrations are reproduced without redrawing from Aluprof's catalogue “Integracja systemów osłonowych z systemami okiennymi MB”. The supplied PDF's contents pages are dated 03/2023; the reproduced sheets 01-1-01.00, 01-2-01.00, 01-2-02.00 and 01-4-01.00 are dated 10/2021. They appear on PDF pages 12, 16, 17 and 24.
Original labels and Aluprof attribution are preserved. BIFORIUM's explanations help readers interpret the details, but do not replace a working design. The catalogue directs users to Aluprof MB documentation for window selection and Aluprof Opole catalogues for shutter selection and installation. Another profile brand requires a separate compatibility solution.
Check current configuration limits in the Aluprof technical catalogue. The linked PE41 page illustrates how permitted dimensions depend on guides, wind class, box and shaft. Its numbers do not apply to every shutter curtain.